Split System AC Units Explained: How They Work, What They Cost, and Whether One Is Right for Your Home
When a summer heat wave hits, a split system ac is a practical cooling option—but you need to know what you’re getting. This post breaks down the basic refrigerant cycle, the outdoor condenser and indoor air handler, and the full cost picture from equipment and installation to ongoing maintenance, so you can decide if a split system fits your home and budget. Written for homeowners in Eva Home Services LLC's service areas, it also covers sizing, efficiency metrics like SEER, and the right questions to ask a contractor before committing.
How Split System AC Works: The Basics You Should Understand
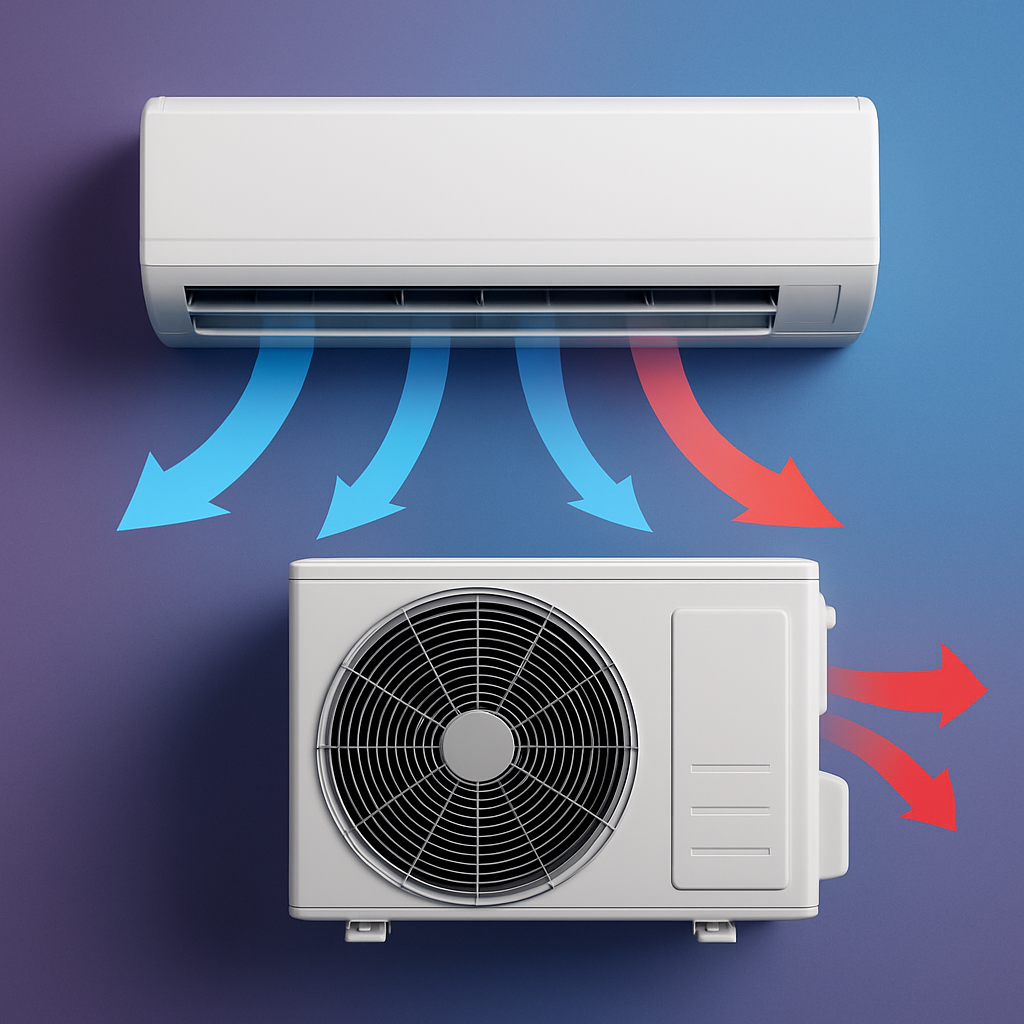
A split system AC hinges on two principal units: the outdoor condenser and the indoor air handler. The outdoor unit sits outside and houses the compressor, the condenser coil, and a fan. The indoor unit lives inside and contains the evaporator coil, the blower, and a filter. This separation keeps the heavy machinery outdoors while pushing cooled air through the home’s supply ducts. In many homes you’ll see one outdoor unit feeding multiple indoor air handlers in a multi-zone setup, which lets you condition different spaces with varying schedules. The practical implication is straightforward: if you’re buying new, you must pair the right outdoor capacity with the right indoor unit family and ensure the duct system can carry the airflow you need.
The refrigerant cycle is the core of cooling. When the thermostat calls for cooling, the compressor in the outdoor unit pressurizes the refrigerant and drives it into the condenser coil, where heat is rejected to the outside air and the refrigerant condenses into a high-pressure liquid. That liquid travels to an expansion device, its pressure drops, and it flows through the indoor evaporator coil. There it absorbs heat from indoor air and turns back into a low-pressure gas, ready to be drawn back to the compressor. The cycle repeats, with the indoor fan moving cooled air across the evaporator and into the living spaces. Some systems use inverter motors that vary speed to match demand instead of repeatedly cycling on and off, which saves wear and reduces humidity swings.
Controls and airflow delivery tie the pieces together. The thermostat signals when cooling is needed and, in many setups, communicates with both outdoor and indoor units as a network. The indoor air handler’s blower pushes air through the evaporator coil and into the ductwork; a filter protects comfort and indoor air quality. Duct design, seal integrity, and refrigerant charge all influence performance; a slight mismatch can produce cold air at the unit but weak cooling at distant rooms. For homeowners, that means you should expect a commissioning step where techs verify airflow, seal ducts, and confirm the refrigerant charge is correct.
Example: In a typical 1,800-square-foot home with a single-zone layout, a 2.5-ton split system rated around SEER 16 is installed. On a 95-degree day, the outdoor unit runs continuously while the indoor blower moves air at comfortable temperatures. If the ducts leak or are poorly sized, the far rooms feel warmer despite the unit running efficiently—demonstrating why ductwork quality can trump the numbers on the box.
A practical trade-off to plan for: higher efficiency units (larger SEER or inverter-driven) deliver lower operating costs but require higher upfront investment and sometimes more complex installation. The gains from energy efficiency only materialize if the system is properly sized and the ducts are sealed and balanced. Short cycling is a common pitfall of small, oversized systems, which wears mechanicals prematurely and undermines humidity control. Given that, expect a careful design process: load calculations, line-set sizing, and a thorough duct assessment are not optional.
Core Components and Their Roles
The core components are not decorative labels; they form a system. The outdoor condenser dumps heat, the indoor air handler distributes cooled air, and together with the filter system, refrigerant lines, expansion device, and thermostat, they determine comfort, efficiency, and reliability.
- Outdoor condenser: the heat rejection engine; airflow, fan condition, and clean fins directly affect heat transfer and overall efficiency. When the condenser sits in open air, a light rain or nearby debris can degrade performance noticeably if fins are clogged or bent.
- Indoor air handler: houses the evaporator coil and blower; how well it distributes air controls comfort and perceived cooling. Proper cabinet sealing and balanced duct connections matter as much as coil condition.
- Filter system: protects coils and indoor air quality; dirty filters raise pressure drop and energy use while stressing the blower. Neglect here shows up as reduced airflow and cooler spots in the house.
- Refrigerant lines: the sealed conduit carrying refrigerant between units; leaks or improper sizing blunt cooling performance and can damage compressors. Any oil stains near the outdoor unit or persistent frost on the evaporator coil signal a professional check.
- Expansion device: meters refrigerant flow into the evaporator; mis-sizing causes frost or inadequate cooling and longer cycle times. If you notice ice forming on the coil or uneven cooling, the expansion device or charge is a suspect.
- Thermostat: senses space temperature and controls cycling; calibration and compatibility with current controls influence comfort and energy use. A smart thermostat can optimize run time, but it must be properly wired and compatible with inverter-driven equipment.
Common failure points to watch for during maintenance include clogged filters, dirty or iced coils, refrigerant leaks, loose electrical connections, and duct or insulation gaps that undermine airflow. If you notice uneven cooling, loud cyclic noises, or sudden spikes in energy use, these are usually symptoms of one of these issues and warrant a professional check.
Example: In a 1,800 sq ft home with year-round dust, a local contractor replaced the outdoor condenser and indoor air handler and upgraded filtration. After the retrofit, the homeowner saw steadier temperatures and a 12–15% reduction in monthly cooling costs in the first cooling season, even before any climate control adjustments.
Takeaway: Inspect and document component health as you plan a split-system upgrade; that health check predicts maintenance needs and energy use more reliably than price or SEER alone.
Costs Unpacked: Equipment, Installation, and Ongoing Expenses
Costs break into three buckets: equipment price, installation labor and permits, and ongoing maintenance plus energy costs. The sticker price on a split system ac is only part of the equation; ductwork status, electrical upgrades, and code requirements can swing the total considerably. For context on efficiency and lifecycle costs, see Energy.gov's guidance on central air conditioning and ENERGY STAR's central air page: Energy.gov central air conditioning | cooling/centralair_conditioners target=_blank>ENERGY STAR central air conditioning.
Three main cost drivers show up when you price a system: the price of the equipment itself, installation labor (including any ductwork modifications and electrical work), and permits or inspections. Ductwork quality and the need for retrofits often become the biggest variables, pushing total cost up or down independent of the unit size. Here are typical installed price ranges by common tonnage to anchor expectations (these are illustrative, not location-specific):
| Tonnage Range | Installed Price Range (total) | Notes |
|---|---|---|
| 1.5-2 ton | $5,000–$8,000 | Minimal ductwork tweaks; basic wiring; small homes |
| 2.5-3 ton | $7,000–$12,000 | Most common; potential duct sealing or minor retrofits |
| 3.5-4 ton | $9,000–$14,000 | Larger systems; may involve more substantial electrical work or duct modifications |
Ongoing costs hinge on energy use and maintenance. A higher SEER (seasonal energy efficiency ratio) unit costs more upfront but typically lowers operating expenses over the life of the system, especially in hotter climates or with long cooling seasons. Maintenance plans, filter changes, coil cleaning, and drain checks add predictable annual costs but reduce the risk of expensive failures later. Expect annual tune-ups to run around the low hundreds, with comprehensive maintenance contracts covering more visits and parts in the price range of a few hundred dollars per year. For context on efficiency standards and potential savings, see ENERGY STAR and Energy.gov resources linked above.
A practical takeaway is to demand a transparent breakdown in quotes: equipment price, installation labor, permits, any ductwork or electrical work, and a recommended maintenance plan. This makes lifecycle costs visible and helps you compare offers on a like-for-like basis. When you’re ready, review the contractor’s scope to ensure it covers duct sealing, refrigerant handling, and post-install commissioning as part of the installation package.
Is a Split System Right for Your Home? Fit Considerations
Fit depends on three realities: ductwork condition, outdoor space, and climate driven load. If your current central system has leaky or undersized ducts, a split system may not deliver promised efficiency without a duct retrofit. If you lack space for an outdoor condenser or the yard has noise or setback concerns, it may not be feasible.
Key fit factors to evaluate
- Duct integrity matters: Leaks or poor sealing can erode performance and raise operating costs; duct sealing or replacing sections may be required to realize the system level efficiency.
- Outdoor space constraints: Yard footprint, setbacks, and proximity to property lines influence condenser placement, noise, and accessibility for service.
- Climate and load profile: In hot climates, high SEER and inverter driven compressors pay off over time; in milder climates, mid range units may provide the best balance of cost and comfort.
- Zoning and room targeting: Multi zone options or wall mounted indoor units enable better control for upstairs bedrooms or sun exposed spaces, which is a common driver for split system viability.
- Electrical service and permits: Panel capacity, wiring upgrades, and local permits can add to installation time and cost; plan for these upfront.
- Maintenance access: Ensure there is clear running space for the outdoor unit and easy access to the indoor air handler and filters.
Concrete Example: A two story 1,800 square foot home has aging ducts and a cramped yard. An assessment finds significant duct leaks and limited outdoor space for a large condenser, so the plan is to seal and upsize the air handler and install a high SEER split system for the main living areas. The upfront cost is higher, but projected energy savings improve the payback over several years.
Bottom line: if you have solid ducts and room for the outdoor unit without compromising space or sightlines, a split system can be a solid, energy efficient choice. If not, weigh ductless or compact packaged options and bring in a local contractor early to map load, permits, and a practical retrofit plan.
Sizing, Efficiency, and Longevity
Sizing a split system isn't about the biggest unit you can fit. Real-world results hinge on matching capacity to the home's load and ensuring efficient cycling. An oversized unit will short-cycle, fail to dehumidify, and wear out compressors faster. Undersized systems run continuously, struggle to reach setpoints, and tolerate heat poorly. In both cases, comfort and energy bills suffer.
Efficiency shows up in SEER and life-cycle cost. A higher SEER reduces annual energy use, but the upfront premium only pays off if you stay in the home long enough and climate makes cooling a regular expense. In milder climates, the delta in energy cost may be modest, so a mid-range SEER often makes the most sense.
How SEER translates to dollars
SEER is a comparative efficiency rating. In hot climates, moving from SEER 14 to SEER 16 can cut cooling energy use by roughly 6–15% depending on usage patterns and electricity prices. Over a decade, that difference compounds into meaningful savings, especially if you run the system year-round. The payoff also hinges on proper sizing and quality installation.
- Manual J load calculations: Ensures accurate sizing rather than rule-of-thumb guesses.
- Duct condition and airflow: Duct leakage or undersized ducts undermine high-SEER units and nullify efficiency gains.
- Electrical and controls compatibility: Modern inverter drives and smart thermostats maximize performance when the electrical system and wiring are up to it.
Concrete example: A two-story 1,800 sq ft home in a hot climate installs two options: SEER 14 at 2.5 tons and SEER 16 at 2.5 tons after a full Manual J. The 16 model uses about 15–25% less electricity for cooling, depending on occupancy and thermostat behavior. Over 10 years, the energy savings can cover part of the higher upfront cost, especially if the home is occupied long-term and electricity prices rise.
Key point: Higher SEER is not automatically worth the premium; assess life-cycle cost based on climate, occupancy, and electricity rate.
Takeaway: Insist on a formal load calculation and a documented life-cycle cost analysis as part of the quote; next, align on installation day expectations.
Installation Day: What to Expect and How Eva Home Services Helps
Installation day is when plans become reality. For a split system AC, you should expect a tightly choreographed sequence from pre-install assessment to commissioning, with permits and electrical work handled by the contractor. You will not be left guessing about timelines or responsibilities; your contractor should set a clear schedule and keep you aligned on what happens when.
Pre-install assessment focuses on space, electrical service, and accessibility. Expect checks of service size (amperage), available clearance around the outdoor condenser, locations for the indoor air handler, and potential ductwork adjustments. This is where hidden constraints show up, such as a panel that needs upgrading or a crawlspace that's tighter than it looks.
- Electrical work and disconnects performed by licensed electricians on-site.
- Permits filed and inspections scheduled as required.
- Outdoor condenser placed on a stable pad with minimal vibration, lines routed neatly and secured.
- Indoor air handler mounted, with refrigerant lines insulated and tested for leaks, and thermostat compatibility confirmed.
Concrete Example: A typical two-ton split system installation for a 1,200 sq ft home begins after the pre-install assessment. The team places the outdoor condenser on a concrete pad, routes the line set through a protected chase, and wires the new 240V circuit. After a leak check and refrigerant charge, the system is commissioned and the thermostat is programmed.
Not every project runs in a neat one-day window. If retrofit ductwork is required or electrical service needs an upgrade, schedule can slip. Budget a buffer and communicate any access or attic space constraints upfront to avoid surprises.
Eva Home Services coordinates all practicalities on installation day, from obtaining permits to final commissioning and providing a written warranty and maintenance plan. You should receive a clear scope, an on-site safety checklist, and post-install test results before sign-off. See how this fits with energy and reliability expectations by checking Energy.gov central air conditioning guidance and our HVAC repair options page if issues arise later.
Next consideration: ask for a written installation window, a scope of work, and a maintenance plan that includes annual tune-ups and filter replacement reminders.
Maintenance and Troubleshooting to Extend Life
Maintenance is not optional for a split system ac. Without routine care, performance declines, energy bills rise, and components wear out faster. Following a steady maintenance cadence aligns with established energy efficiency guidance, such as the Energy.gov recommendations for central air conditioning Energy.gov Energy Saver Central Air Conditioning.
Preventive Maintenance Routine
Set a simple cadence you can actually keep: monthly checks on air filters, annual coil cleaning, drain checks, and a quick electrical inspection during service visits. The goal is to catch small issues before they become expensive failures.
- Filter replacement schedule: Replace disposable filters every 1–3 months; follow manufacturer guidance for washable filters.
- Coil care: Clean the outdoor condenser coil and indoor evaporator coil annually or during a technician visit.
- Drain system: Clear the condensate drain line and inspect the pan for clogs or leaks.
- Electrical checks: Have a technician verify contactors, capacitors, and wiring; avoid DIY on live circuits.
- Controls and smart thermostat: Ensure thermostat communication and firmware are up to date for reliable operation.
Troubleshooting to Avoid Costly Breakdowns
When issues crop up, triage safely but don’t chase symptoms in isolation. Confirm basic things you can handle: verify the thermostat is actively calling for cooling, replace a clogged filter, and check for obvious airflow restrictions. If the problem persists, engage a qualified HVAC professional rather than patching the system yourself.
- Weak cooling or uneven temperatures across rooms.
- Short cycling or the system running constantly without delivering comfort.
- Ice formation on refrigerant lines or the indoor coil.
- Unusual noises or rattling from the outdoor condenser.
- Water leaks or persistent damp spots near the indoor unit.
Example: A two-story home experiences hot upstairs during afternoon heat. After replacing a dirty filter and clearing debris around the outdoor unit during a routine service, upstairs comfort improves and the system cycles less during peak heat. The homeowner also notices the unit runs more efficiently for the rest of the season.
Takeaway: set up a maintenance plan with Eva Home Services and schedule a yearly tune-up plus quarterly filter checks to maximize reliability and energy efficiency.
Choosing a Contractor: Questions to Ask and Why Eva Home Services Stands Out
Choosing a contractor is as important as choosing the equipment. When you’re evaluating a split system ac, the decision hinges on who installs it, how they manage permits, and what happens after startup. A credible pro will confirm licensing and insurance, spell out warranties, and deliver a detailed installation scope before any work begins. Price will always be part of the conversation, but reliability, proper sizing, and a clear commissioning plan are the real levers of long-term comfort. Look for SEER ratings and ENERGY STAR labeling to gauge long-term costs; see Energy.gov's central air conditioning guide and ENERGY STAR's central air conditioners page for context. Eva Home Services provides HVAC installation and repair with a focus on safety, reliability, and long-term value, see our Professional HVAC Repair Services page.
- Licensing and insurance: Verify current license type and proof of insurance; confirm coverage for employees and liability.
- Warranties and guarantees: Get a written warranty that covers parts, labor, and compressor; clarify exclusions and whether a separate workmanship warranty applies.
- Installation scope and permits: Ask for a detailed, itemized quote that includes required permits, electrical work, ductwork assessment, refrigerant line set installation, drainage, and commissioning.
- Equipment specifics and SEER/brand: Confirm model, SEER rating, compressor type (inverter vs fixed-speed), indoor air handler compatibility, smart thermostat readiness.
- References and track record: Request three local references and verify online reviews; check AHRI matching to installed equipment.
- Financing options and maintenance plans: Inquire about payment terms, financing, and whether maintenance plans or service contracts are included or available.
Example scenario: Maria had two bids for a 2,000-square-foot home. Bid A was the lowest price but omitted permits and offered only a 12-month parts warranty. Bid B priced higher but included permits, duct sealing assessment, a 5-year workmanship warranty, and a commissioning visit. She chose B, valuing the risk reduction and long-term service over upfront savings.
A practical trade-off to watch is price versus completeness. Cheap bids that skip permits or commissioning often leave you with suboptimal airflow and voided guarantees. A contractor who bundles a maintenance plan and flexible financing delivers better life-cycle value, provided the installation is performed correctly and the equipment is appropriate for your climate.
Takeaway: use a structured contractor evaluation checklist and request a site assessment before you sign. A good local contractor translates equipment specs into install specifics and provides a clear path to ongoing support.