Air Conditioning Tune-Up: What an HVAC Pro Does to Improve Efficiency and Prevent Breakdowns
When your air conditioner struggles through summer, an air conditioning tune up is the service that most reliably reduces energy use and prevents small problems from turning into expensive failures. This post explains the concrete checks and measurements a professional HVAC technician performs, such as delta T, refrigerant pressures, motor amperage, and coil and condensate inspections, why each step matters for efficiency and reliability, and what typical repairs cost. You will also get practical guidance on choosing and preparing a contractor so the tune up delivers measurable improvement rather than a vague checklist.
Comprehensive Tune-Up Checklist with Rationale
Straight answer: a valuable air conditioning tune up is a sequence of measurements and targeted actions, not a cursory visual check. Each line on the checklist exists to either recover lost cooling capacity or prevent a failure that will cost far more than the service itself.
Itemized checks and why they matter
- Startup and control observation: verify correct cycling, listen for abnormal sounds, and confirm the thermostat calls for cooling. This exposes hard starts, short cycling, and control wiring faults that otherwise escalate quickly.
- Filter inspection and replacement: dirty filters restrict airflow and raise blower amps. Replacing with the right MERV rating restores flow without overstraining the fan motor.
- Evaporator and condenser coil inspection/cleaning: dirty coils block heat transfer. Cleaning restores system capacity; note that aggressive coil washing risks bent fins or chemical residue if done incorrectly.
- Condensate drain and pan service: clear clogs, verify trap and float switches. Standing water leads to overflow, interior damage, and microbial growth that undermines indoor air quality.
- Electrical and component tests: measure motor amperage, test capacitor microfarads, inspect contactor points and connections. Small electrical faults produce repeated compressor starts or premature motor failure.
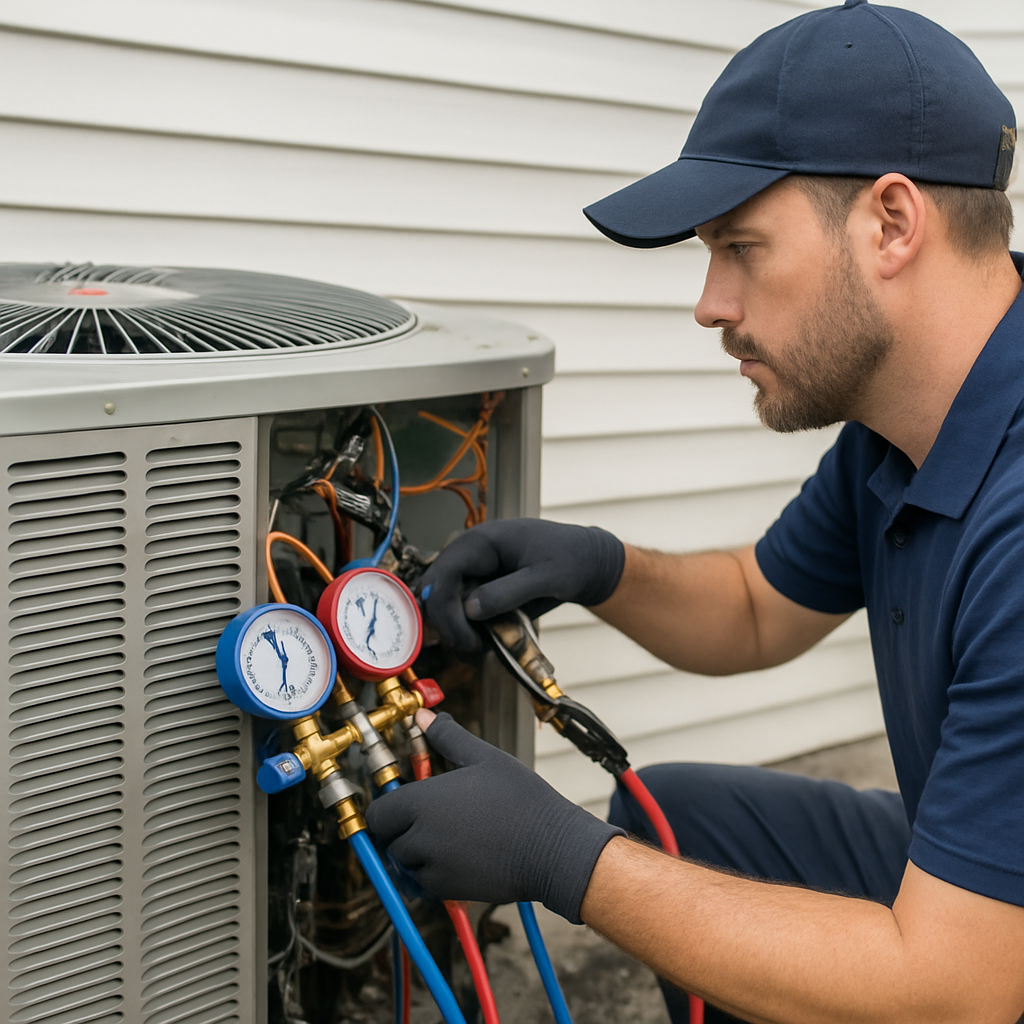
- Refrigerant pressure and charge check: measure suction/discharge, calculate superheat/subcooling and compare to manufacturer targets. An accurate charge correlates directly with efficiency and compressor life.
- Airflow and static pressure quick-scan: measure delta T across the evaporator and note static pressure trends. Low airflow is the single most common cause of poor cooling and high energy use.
- Thermostat calibration and control verification: confirm setpoint accuracy and correct staging. Miscalibrated thermostats can make a healthy system run unnecessarily long.
- Ductwork quick visual: check for obvious breaks, disconnected boots, or insulation loss. Major duct issues belong to a follow-up scope but are flagged during a tune-up.
Concrete Example: A homeowner reported weak cooling despite a recent filter change. The technician measured a low delta T and found a badly fouled evaporator coil plus a partially blocked condensate trap. After coil cleaning, drain clearing and a blower speed adjustment, measured return-to-supply temperature difference moved into the expected range and runtime dropped noticeably.
Practical trade-off: technicians can either perform basic cleaning and a visual check in 20 minutes or run full diagnostics that include amp clamps, manifold gauges and static pressure readings which takes 45–90 minutes. The longer service costs more up front but uncovers the issues that cause midseason breakdowns. In practice, cheap inspections often miss the failure modes that lead to compressor replacement.
Key measurements technicians should record
| Measurement | Typical target or note |
|---|---|
| Delta T (supply minus return) | About 16 to 22 °F for many residential systems; check equipment spec for exact target |
| Compressor and fan motor amperage | Within roughly 10 to 20 percent of nameplate under steady state; spikes or sustained high amps signal trouble |
| Static pressure (total) | Keep total external static pressure low; many systems target under 0.5 in WC but follow manufacturer guidance |
| Subcooling / Superheat | Manufacturer specific; technician calculates to confirm correct refrigerant charge |
Must do: insist on a documented service sheet with these measured values and photos of any problem areas so you and the contractor are aligned on next steps.
Next consideration: when you schedule a professional AC tune up, ask whether the quoted service includes the measurements above, photographic evidence for issues found, and a written recommendations list you can review before authorizing repairs. For more on service options and maintenance plans see maintenance and refrigerant handling rules at EPA Section 608.
Safety, Pre-Inspection and Documentation Practices
Start with safety as an active process: a professional air conditioning tune up begins with risk elimination, not a casual glance. Technicians should verify disconnects, apply lockout-tagout where live work is possible, confirm voltage absence with a meter before touching terminals, and use PPE for eye, hand and respiratory protection when working in attics or with chemical cleaners.
Why pre-inspection matters: a short, targeted pre-inspection determines the scope of safe, effective diagnostics. That means a visual approach to hazards (rusted disconnects, poor platform access, rodent damage to wiring), a quick functional check of the thermostat schedule and history, and a decision whether the job requires a second technician or special equipment to avoid unsafe single-person lifts or attic falls.
What homeowners should do before the tech arrives
- Clear and accessible work area: move plants, vehicles or stored items near the condenser so the tech has 3 feet of clearance for safe service.
- System access info: leave gates unlocked, note attic hatch locations and thermostat schedules if you want normal settings preserved.
- Share history: tell the technician about recent failures, noises, trips to the breaker or prior refrigerant work so they can plan for proper diagnostics.
Documentation is the service, not an add-on: good contractors record measured diagnostics (amps, pressures, delta T), take photos of any corrosion, leaks or wiring damage, log serial numbers and note replaced parts with part numbers. A digital record with timestamps protects both homeowner and technician and is the baseline for warranty, future troubleshooting and any insurance claims.
A practical trade-off to accept: comprehensive documentation and safety steps add time and cost to the visit. That extra 30–45 minutes catches problems that a quick visual check misses and usually saves money later, but it does mean the lowest-priced AC tune up services are often incomplete. Decide whether you want a cursory seasonal check or documented diagnostics that support repair-versus-replace decisions.
Important legal and procedural constraint: refrigerant work must follow EPA requirements and be performed by Section 608 certified technicians; handling refrigerant incorrectly creates legal exposure and environmental harm. For reference, see the EPA guidance at EPA Section 608.
Judgment call technicians should make on site: when they encounter compromised electrical panels, unstable condenser pads, or attic access that requires two-person safety, they should stop, document, and present a written, prioritized plan before proceeding. Proceeding anyway is how short visits turn into expensive callbacks and liability issues.
Concrete Example: A tech arrives for an air conditioning tune up and finds a corroded disconnect with loose screws and a sump pump sharing the same service panel. They lock out the circuit, photograph the corrosion and panel labeling, measure motor amps after stabilizing the circuit, then leave a report showing the electrical risk and a quoted fix. The homeowner can review numbers and photos before authorizing the electrical repair that prevents a midseason compressor failure.
Electrical and Control System Testing
Straight to the point: the electrical and control side determines whether a healthy-looking AC will run reliably or fail under load. Technicians who only look at wiring for corrosion miss the transient and load behaviours that actually kill compressors and motors.
What a pro actually measures and why it matters
Load verification over cursory checks: instead of just checking for voltage at the disconnect, insist on measurements taken while the system is under steady operation. Those readings reveal voltage drop, poor phase balance, and overheating connections that a static check won't show.
- Voltage under load: measure at the compressor and fan to spot under-voltage that raises current draw and shortens motor life.
- Starting and running current: capture inrush and steady-state current with a clamp capable of peak readings so a weak start circuit or failing motor is evident.
- Connection thermal scan: use an infrared camera to find hot lugs, loose breakers or corroded terminals before they become intermittent failures.
- Control circuit health: verify transformer secondary voltage, control fuse condition, and relay sequencing so safeties and staged compressors behave predictably.
- Safety interlocks: test float switches, high-pressure and low-pressure safeties under realistic conditions to ensure a nuisance shutdown isn't masking a deeper issue.
Practical trade-off: an advanced electrical check adds time and a small fee but prevents the far more expensive outcome of a midseason compressor failure. On older systems you may also face the decision to repair marginal electrical gear or budget for system replacement; there is no middle ground that permanently fixes an overloaded 15-year-old compressor without addressing root causes.
Concrete Example: A homeowner scheduled an air conditioning tune up after frequent hard-start clicks. The technician recorded a 40 percent higher start current than expected, performed a thermal scan and found a loose lug at the outdoor contactor. Tightening the connection and replacing a failing start capacitor stopped the hard starts and eliminated repeated breaker trips, avoiding a compressor replacement estimated at several thousand dollars.
What technicians sometimes get wrong: replacing capacitors or contactors without confirming voltage stability or checking the control transformer simply delays failure. Capacitor replacement is cheap, but if the root cause is a sagging supply or overloaded circuit, the new capacitor will fail too.
Insist on load-conditions testing (voltage under run, inrush and steady current, and a thermal scan) and photographic evidence of any hot connections or wiring damage.
Next consideration: ask whether the quoted AC tune up includes these electrical tests and documentation. If your home shares a panel with other large loads or shows any nuisance trips, be prepared for an electrician referral; addressing shared-circuit issues is often necessary for reliable central air conditioning maintenance. For more on maintenance options see maintenance.
Refrigerant Charging and Leak Detection Protocols
Direct point: Proper refrigerant handling is a diagnostic process, not a quick top-off. In an air conditioning tune up the technician must determine whether the system is undercharged because of a leak, or simply out of balance due to manufacturing tolerances or previous service. Doing the wrong thing here masks failures and shortens compressor life.
How professionals approach charging — the correct sequence
A reliable workflow matters because pressures and temperatures move around with ambient conditions and load. First the tech confirms the equipment spec and refrigerant type from the nameplate, then records baseline pressures and temperatures while the system is running. Next they calculate superheat and subcooling to diagnose if the charge is low or high. When a recharge is needed, the preferred method is a weigh-in using factory charge targets or retrofit specs, not a pressure-only fill. Charging by pressure alone routinely gives incorrect charge on hot roofs or partly shaded condensers.
- Electronic leak detectors: fast for sniffing welds and valve cores but require calibration and careful technique; they can miss very small or intermittent leaks.
- Nitrogen pressure testing: use dry nitrogen with a regulator and a soap solution to find bubbles; safe and thorough but requires full evacuation afterward to protect the compressor.
- Vacuum and hold test with micron gauge: confirms system integrity after repairs; a slow rise in microns shows leakage or moisture contamination.
- UV dye and UV lamp: effective for locating slow or hidden leaks but dyes complicate later refrigerant recovery and are not always recommended without prior agreement.
Trade-offs to weigh: electronic sniffers are efficient for symptomatic searches, while nitrogen and micron-based holding tests provide proof for warranty or replacement decisions. UV dye helps find stubborn traces but introduces contaminants that can complicate future work. Whatever method is used, refrigerant must be handled per EPA Section 608 by certified technicians, and recovered refrigerant needs proper capture — a dump-and-refill approach is both illegal and harmful to the system.
A common mistake is charging to a target pressure without correlating temperatures or recording the weigh-in amount. That can temporarily improve cooling and hide a leak until the system loses refrigerant again. Ask for documented gauge readings, the weight added or removed, and photos of service valves and nameplate so you have a verifiable record.
Concrete Example: A homeowner called after a house felt warm despite normal fan sound. The technician put gauges on the lines, ran a superheat/subcooling check and found the charge low. A quick electronic sniff failed to find the source, so the tech pressurized the system with dry nitrogen and used a soap solution to reveal a slow leak at the service valve. The tech evacuated to a safe vacuum, repaired the valve, and recharged by weight, then left a documented report showing the recover/recharge amounts and photos of the repaired valve.
Must know: never accept an undocumented refrigerant top-off. If a technician cannot show how much refrigerant was added or the leak test used, insist on proper documentation or get a second opinion.
Airflow, Coil Cleaning, Condensate and Ductwork Focus
Airflow loss is usually the real reason an AC feels weak — not the compressor. Dirty coils, blocked condensate paths and compromised ducts all reduce the volume of air moving through the evaporator, which raises motor stress, shortens compressor life, and increases runtime. A technician focused on efficiency treats these four items as an interdependent system rather than independent chores.
Inspection and fix workflow
Stepwise approach: technicians should first quantify the problem, then isolate components. Start with a quick airflow measurement, follow the airflow path through filter and coil, verify condensate flow and pan integrity, and finish with a duct quick-scan to find major leaks or crushed flex runs. Never skip measured before/after values; they prove whether cleaning or repair actually recovered performance.
- Measure: record static pressure or a simple flow differential across the coil and filter so you have a baseline.
- Inspect: visually check coil fins, look for oil stains (possible leak), and probe the condensate trap and pan for blockages or corrosion.
- Clean selectively: use soft brushing, low-pressure rinsing or a manufacturer-approved chemical on coils — avoid high-pressure washes that bend fins or strip protective coatings.
- Address condensate: clear the trap, snake the drain, test float switches and consider a condensate safety switch if the unit serves finished space.
- Quick-scan ducts: use a smoke pencil or pressurize with a fan to reveal big leaks and crushed runs; prioritize sealing large leaks before expensive cleaning.
Practical trade-off: aggressive coil cleaning often gives fast gains but carries risks — bent fins, dislodged foam or chemical residue that shortens coil life. When coils are heavily corroded or fins are irreparably damaged, cleaning is temporary; replacement is the durable solution. Expect a conscientious tech to recommend replacement when cleaning will not meet long-term efficiency goals.
Ductwork judgment: duct cleaning sells easily but rarely yields measurable energy savings unless ducts are clogged with debris, infested with vermin, or contaminated with mold. In most homes, sealing major leaks with mastic and insulating unconditioned runs produces bigger and longer-lasting reductions in run time than a generic duct cleaning.
Concrete Example: A homeowner called about musty returns and a drop in cooling. The tech found a full condensate pan that had leaked into an attic duct chase and a crushed flex return. Clearing the drain, installing a condensate safety switch, and replacing the crushed run restored normal airflow; the musty smell resolved without a costly full-duct clean.
Ask for before/after readings and photos of the coil, condensate pan and any duct repairs so you can see the measurable change — not just a checkbox saying cleaning was performed.
Performance Testing, Calibration and Optimization
Direct point: a proper air conditioning tune up finishes with performance verification — not just visual fixes. Technicians should prove the system reaches stable operating conditions, then make targeted calibrations so what looks good on a bill actually performs in your home.
What professionals measure during optimization: rather than a checklist of pass/fail items, expect a short performance program: establish a steady-run baseline with a data logger or handheld sensors, record temperature differences at supply and return, capture compressor and fan current over several on-cycles, and monitor cycling behavior to identify short cycles or demand spikes. These readings show whether cleaning and repairs restored the system or only produced temporary improvement.
Practical calibration steps a tech will take
- Establish steady state: run the system long enough under realistic load to avoid chasing transient numbers.
- Thermostat calibration and staging: compare the thermostat reading to a reference thermometer and verify stage transitions (single-, two-stage or variable speed) behave as intended.
- Blower and fan tuning: adjust blower speed or fan curve on variable motors to balance supply temperature and airflow without overtaxing the motor.
- Compressor load verification: observe compressor amps and temperature trends across a run cycle to detect ongoing stress or degrading performance.
Trade-off to understand: longer, instrumented testing catches intermittent problems but costs more time and therefore a higher service fee. Short visits save money up front but can miss rare faults — think of the difference between a snapshot and a multi-hour trend log. Choose based on symptoms: unexplained cycling or uneven rooms justify the deeper test.
Common real-world misstep: many contractors stop after cleaning coils and swapping filters. That can restore some capacity, but without calibration the system may still short-cycle or run inefficiently. In practice, a well-calibrated blower and a correctly staged thermostat often deliver more usable comfort and lower runtime than a cosmetic coil clean alone.
Concrete example: A homeowner complained of wide temperature swings between upstairs and downstairs. During the air conditioning tune up the technician logged supply/return temps and fan current for 30 minutes, adjusted the fan curve on the variable-speed blower and reconfigured thermostat staging to prioritize longer, gentler cycles. The result: smaller temperature swings and fewer compressor start-stops, confirmed by the after-test logging left on the service report.
Ask for the data: require before-and-after logs or at minimum photos of meters and the thermostat calibration reading so you can see the improvement, not just hear a verbal claim.
Judgment call for homeowners: if you have an older system, expect diminishing returns from calibration alone — mechanical wear or coil corrosion sometimes means only replacement will deliver reliable, efficient operation. For newer systems, optimization buys visible runtime and comfort gains and delays expensive replacements.
Common Tune-Up Findings, Typical Repair Costs and Next Steps
Straight answer: most tune-ups reveal a short list of predictable problems that are inexpensive to fix when caught early and very expensive if deferred. Knowing which items are likely and what they cost lets you prioritize repairs and avoid a midseason emergency.
| Common Finding | Typical Symptom | Usual Fix or Action | Typical 2026 Cost Range |
|---|---|---|---|
| Failing start/run capacitor | Hard starts, humming, frequent failures | Replace capacitor and retest motor start currents | $120 to $350 |
| Worn contactor or relay | Intermittent outdoor unit operation, pitted contacts | Replace contactor and clean connections | $150 to $400 |
| Low refrigerant from leak | Reduced cooling, low suction pressure | Leak detection, repair, vacuum, recharge by weight | $150 to $600 (varies by refrigerant) |
| Clogged condensate drain or bad trap | Overflow risk, musty odors | Clear drain, replace trap or install safety float | $100 to $300 |
| Failing blower motor or bearings | Reduced airflow, noisy fan, high amp draw | Replace motor or motor assembly | $400 to $1,200 |
| Compressor failure | No cooling, high amps, burned oil smell | Replace compressor or entire condensing unit | $1,800 to $4,500 |
| Damaged or corroded coil | Poor heat transfer, sustained low delta T | Repair fins, chemical clean, or replace coil | $800 to $2,500 |
Practical trade-off: small electrical parts and drain repairs are usually worth doing immediately because they cost a fraction of a compressor replacement. When a tune-up surfaces a compressor or coil failure, treat the repair-versus-replace decision as an investment calculation: compare the repair cost plus expected remaining life to the price of a new, higher-efficiency system and factor in refrigerant type if it is an older R-22 system.
Concrete example: A homeowner accepted a $310 repair to replace a start capacitor and contactor after a tune-up. That stopped hard starts and electrical cycling. Six weeks later a nearby unit with similar symptoms was allowed to run until the compressor failed; the repair for that unit was roughly ten times higher and the technician recommended full replacement because the system was 15 years old and used phased-out refrigerant.
What to expect next after a tune-up: insist on a written report that lists measured readings, photos of problem areas, a prioritized repairs list, and clear cost estimates. For any refrigerant work, verify the technician will handle recovery and charging per EPA Section 608. For major items get at least two independent estimates and confirm parts and labor warranty terms before authorizing expensive work.
Key action: do the low-cost fixes now and document them. Treat compressor or coil findings as strategic decisions — decide based on age, total cost, and documented efficiency gains rather than emotion or a single price.